Reformat Hard Drive To Mac: A Comprehensive Guide For Every Tech Enthusiast
Reformatting your hard drive to Mac might sound like a daunting task, but trust me, it’s not as scary as it seems. Whether you’re switching from Windows to macOS or just want to give your Mac a fresh start, this guide will walk you through every step of the process. So, buckle up, and let’s dive right in!
There comes a time when your Mac feels sluggish, or you’ve just bought a new external drive that needs to be compatible with macOS. Reformatting is the answer. It’s like giving your hard drive a spa day, but instead of facials, it’s about clearing out the clutter and setting it up for optimal performance.
Now, before we get into the nitty-gritty details, let’s talk about why reformatting is essential. It’s not just about freeing up space; it’s about ensuring your Mac runs smoothly, securely, and efficiently. Plus, it’s a great way to wipe out any pesky viruses or malware that might be lurking in the shadows.
Read also:What Did Barry Weiss Do For A Living Unveiling The Career Journey Of A Remarkable Figure
Why Should You Reformat Your Hard Drive to Mac?
Let’s break it down. Reformatting your hard drive to Mac can offer a ton of benefits. First off, it helps you optimize your storage for macOS, which is crucial if you’re using an external drive or switching from Windows. Secondly, it ensures that your files are stored in a format that’s compatible with Apple’s ecosystem. And lastly, it’s a clean slate—perfect for starting fresh or troubleshooting issues.
Here’s the deal: macOS uses a file system called APFS (Apple File System), which is optimized for speed and security. If your drive is formatted in something like NTFS or FAT32, you’re not getting the full potential of your Mac. Reformatting ensures that your drive is set up for success.
Understanding the Basics of Reformatting
Before we jump into the steps, let’s talk about the basics. When you reformat a hard drive, you’re essentially erasing everything on it and setting it up with a new file system. For Mac users, this means using either APFS or HFS+ (for older Macs). Think of it like tearing down an old house and building a brand-new one.
Now, here’s the important part: reformatting will erase all data on the drive. So, if you’ve got important files, you’ll need to back them up first. Don’t worry; we’ll cover how to do that later. But for now, just remember that reformatting is a clean break—no turning back once you hit the erase button.
What Happens When You Reformat?
When you reformat, your drive gets a fresh file system. This means it’s optimized for the operating system you’re using. For Macs, that’s either APFS or HFS+. Here’s what happens during the process:
- All data on the drive is erased.
- The file system is rewritten to match the chosen format.
- The drive is ready for new data to be written to it.
It’s like resetting a game console to factory settings. Everything goes back to zero, and you’ve got a fresh start.
Read also:Redhead Jokes Thatll Have You Laughing Until Youre Red In The Face
Steps to Reformat Hard Drive to Mac
Alright, let’s get to the good stuff. Here’s how you can reformat your hard drive to Mac in just a few simple steps. Don’t panic—it’s easier than you think!
Step 1: Back Up Your Data
This is the most crucial step. Before you reformat, you need to make sure all your important files are safe. You can use iCloud, an external drive, or even a USB stick to back up your data. Just don’t skip this step—it could save you a lot of headaches later on.
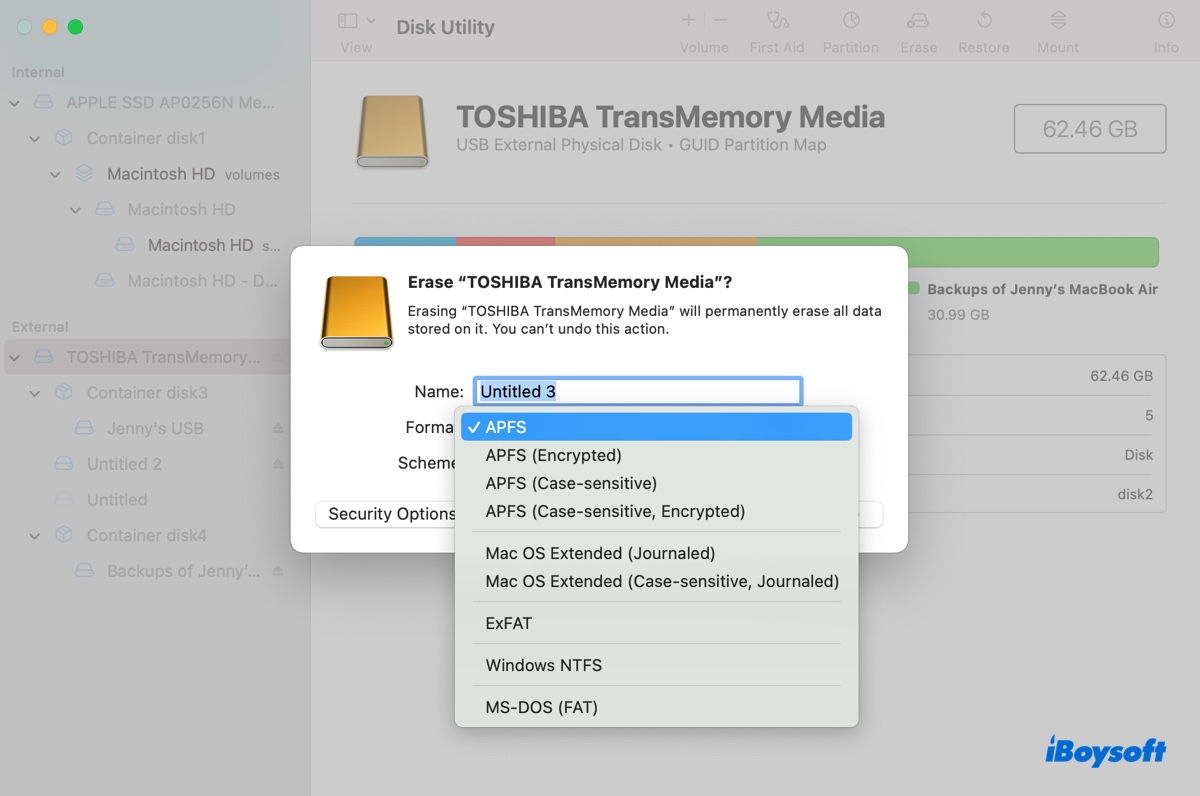
Step 2: Open Disk Utility
Disk Utility is your best friend when it comes to reformatting. You can find it by searching for it in Spotlight or navigating to Applications > Utilities. Once you’ve opened it, select the drive you want to reformat from the list on the left.
Step 3: Choose the Format
Now, here’s where the magic happens. Click on the “Erase” tab, and you’ll see an option to choose the format. For Macs, you’ll want to select either APFS or Mac OS Extended (Journaled). APFS is the newer, faster option, so go with that unless you’ve got an older Mac.
Step 4: Hit Erase
Once you’ve selected the format, hit the “Erase” button. This is the point of no return, so double-check that you’ve backed up your data. The process might take a few minutes, depending on the size of your drive, so grab a coffee and relax.
Step 5: Verify the Format
After the reformatting is done, you can double-check that everything went smoothly by selecting the drive in Disk Utility and clicking “Info.” You should see the new file system listed there. If it matches what you chose, congrats—you’ve successfully reformatted your drive!
Choosing the Right Format for Your Mac
Not all file systems are created equal. When reformatting your hard drive to Mac, you’ve got a couple of options to choose from:
- APFS (Apple File System): This is the default file system for macOS High Sierra and later. It’s fast, secure, and optimized for modern Macs.
- HFS+ (Mac OS Extended): This is the older file system used by Macs before APFS. It’s still supported, but if you’ve got a newer Mac, you’ll want to go with APFS.
Choosing the right format depends on your Mac’s operating system and the type of drive you’re using. For most users, APFS is the way to go.
Tips for a Smooth Reformatting Experience
Reformatting doesn’t have to be stressful. Here are a few tips to make the process as smooth as possible:
- Back up regularly: Don’t wait until the last minute to back up your data. Make it a habit to back up regularly, so you’re always prepared for reformatting or other unexpected events.
- Use Disk Utility: Disk Utility is your go-to tool for reformatting. It’s reliable, easy to use, and built right into macOS.
- Check compatibility: Make sure your drive is compatible with your Mac’s file system before you start reformatting. This will save you a lot of trouble down the line.
By following these tips, you’ll be well on your way to a successful reformatting experience.
Common Mistakes to Avoid
Reformatting can be a tricky process if you’re not careful. Here are a few common mistakes to avoid:
- Not backing up: This is the biggest mistake you can make. Always back up your data before reformatting.
- Choosing the wrong format: Make sure you select the correct file system for your Mac. Using the wrong format can cause compatibility issues.
- Reformatting without a plan: Have a clear plan in mind before you start. Know what you’re reformatting, why you’re doing it, and what you need to do afterward.
Avoiding these mistakes will help ensure a smooth and hassle-free reformatting process.
Advanced Reformatting Techniques
If you’re feeling adventurous, there are a few advanced reformatting techniques you can try:
Reformatting with Terminal
Terminal is a powerful tool that can help you reformat your drive from the command line. Here’s how you can do it:
- Open Terminal by searching for it in Spotlight.
- Use the command `diskutil list` to see all your drives.
- Select the drive you want to reformat by using the command `diskutil eraseDisk format name /dev/diskX`, replacing `format` with APFS or HFS+ and `name` with the name you want for your drive.
Using Terminal gives you more control over the reformatting process, but it’s not recommended for beginners.
Reformatting for Different Purposes
Reformatting isn’t just for switching from Windows to Mac. Here are a few other scenarios where reformatting can come in handy:
- Fixing a corrupted drive: If your drive is acting up, reformatting can help fix the issue.
- Optimizing storage: Reformatting can help you optimize your storage for better performance.
- Wiping out malware: If your drive is infected with malware, reformatting is one of the best ways to get rid of it.
No matter the reason, reformatting can be a game-changer for your Mac.
Conclusion
Reformatting your hard drive to Mac might seem intimidating at first, but with the right tools and knowledge, it’s a breeze. Whether you’re switching from Windows, troubleshooting issues, or just giving your Mac a fresh start, reformatting is a powerful tool in your tech arsenal.
So, what are you waiting for? Grab your Mac, fire up Disk Utility, and get ready to reformat your way to better performance. And don’t forget to share this guide with your friends—knowledge is power, and reformatting is just the beginning!
Table of Contents
Article Recommendations